 About 22 ladies turned out; some finishing projects they had previously started and 11 of us making a button bag. One of our experienced quilters took a very informal and enjoyable class making a Country Button Bag.
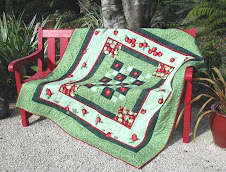
 Well you may realise Country( colours ) isn't exactly me so I chose fabrics that delighted me with their bright and vibrant colours. ( We were allowed to use any colour way we wished ) Very quickly someone commented that mine were the colours seen in a NZ Paua Shell ( abalone ), so my bag became christened the Paua Bag. I kept forgetting to stop and take photos ( must have been concentrating really hard ) but the few progression shots here will give an idea how the bag took shape.
32 squares 3.5" were arranged into rows of 4 and sewn together . The strips of 4 were then sewn to each other side by side using a 1.5" strip of contrasting fabric.( 8 rows ) This was then laid onto the stiff needle point batting and basted with pins.
Beginning on the centre strips it was then quilted in the ditch up and down each side of the connecting strip, moving out towards the sides( then again from the centre going out to the other side ). The pins were removed and quilting down each strip in a zig zag then back up each row of coloured squares diagonally( leaving a cross ).
The batting was then trimmed to the fabric edge. With right sides together pin the bag matching the strips of contrasting fabric and sew the 2 ends ( short side ) together. (forms a hollow tube ).
Rotate the tube with right sides facing till each side of the bag has 3 rows of the coloured squares; this will leave a row of coloured squares at up each side. Pin then sew along the bag bottom.Now pull sideways the corners at the end of the base to make it like an envelope flap and stitch across the end. Now cut off the triangle of fabric this has formed.( exactly the same amount at each end ) The bag shape should now be able to stand on it's own.
An old button from your button box ( wish I had thought to look for and buy some Paua buttons ) is then stitched in the middle of each square. ( I think this could have been done by machine while the fabric was still a flat piece) . I didn't put any down the sides of mine as I knew I wanted to pleat the end to make a more secure and less gaping bag.
A lining was then made to match the outer; I put pockets on both sides of mine by using a double piece of fabric, later turned inside out at the end piece of fabric. (others did this in different ways depending how much fabric they had left.) The lining was then sewn down the short side and along the bottom and then sewn into the bag ( making sure it is the right way out )around the top of the bag.
4 little fabric tabs were made to join the handles onto the bag and were sewn into the right position depending on the size and type of handles.The handles have to be put on the tabs before sewing them down. I also made a fabric fastener( closure ) on mine so it can be closed.
A fabric binding strip 2.5" folded in half right side out and pressed was then pinned around the top of the bag and joined diagonally to itself( to make a flat joining ) It is pinned with the 2 raw edges butting up to the raw edge of the bag top. Before sewing on ( using the walking foot ) make sure the handles and any tabs are lying flat down the outside of the bag where they can't get caught in the sewing process). Sew the binding in place using slightly wider than the normal 1/4" seam to make sure all previous sewing is covered by the binding strip.
Fold the binding over and hand stitch into place. I them made a button hole in the tab so it closed over the top button on the bag side ( see photo ). I love the end result! We also did a lot of laughing! Great weekend.
* note in the photo where I am quilting a piece of mauve stuff. We were given it to try instead of gloves when quilting . It is grippy stuff intended for use in caravans or motor homes as a drawer and cupboard lining - to stop things moving ) It worked well holding the fabric. ( I guess it may be found in a hardwear store )*

Thanks for the comments re the kiwifruit. Oh it is such a shame if some of you are getting fruit that is not ripening well for you. You do know the trick of putting them in a paper bag ( not plastic it sweats ) with either a very ripe apple or banana and closing it to keep the ethylene that the ripening apple or banana is giving off inside the bag. The ethylene will hasten the ripening of the kiwifruit. [In the coolstores and reefer ships they have machines called ethylene scrubbers to remove the ethylene from the atmosphere so the fruit won't ripen before they are ready for it ] That is what helps kiwifruit ( and apples ) to be long shelf life fruit.
If you buy lots of fruit at a time you may wish to put just a few fruit in a bag and do this progressively so hopefully they won't all ripen at one time for you.


9 comments:
Thanks for the bag tutorial. I think I actually have a pattern for a smaller, zippered button bag around here somewhere. It's probably buried somewhere in the sewing room. LOL
And thanks for the tip on ripening kiwi. Sometimes the ones we bring home from the store are still a little hard. Every time I eat kiwi nowadays, I think of your orchard!
The bag is terrific, thanks for sharing. I have been using the grippy stuff for a while now, I find it better than any of the commercial products,particularly with larger pieces, *and* threading a needle doesn't become a major hassle. If you have a wandering machine foot a piece under it will keep it in one place
Beautiful bag - I also have been using the grippy stuff - it is really excellent for FMQ.
what a lovely bag - and great tutorial thanks! I love the paua shades you've used, they combine well with the clear shiny handles. When did you pleat the sides, before putting the binding on the top or after?
Hi Janice,
I put the pleat in before the binding went on.The pleat took up the width of the square( 3" ) at each end of the bag. I just pinched the 2 green connecting strips together and sewed the tuck to the bag inside. We did this as someone who had made the bag previously found it was too open( and easy to get things like wallets sneaked out; or have it spill in the car etc. ) That's why I put the fastener on as well. Thanks for your question.
What a beautiful bag!!! And thanks for the tutorial.
Lovely bag, love the colours! And thanks for the tutorial.
Thanks also for the tip about ripening the Kiwis, I knew about using the banana for Avocadoes, but not for the Kiwifruit.
Lovely bag and so easy to do! Thanks for the tip about the gripper and the kiwi ripening.
Ali - it's a lovely bag - the colours are delicious, just what I would choose. Thanks for the tip about the grippy stuff I'm definitely going to look out for some both for machine quilting and to put under my foot pedal
Post a Comment