* Gudrun I don't know why they are called Gum trees ( they do have a sort of gum resin in them - but no more than many trees ) Their real name is Eucalyptus - in Australia they have millions of them. Yes they are wonderful for firewood.
*Tracey snow ( and mountains ) is about 2.5 to 3 hours away from here - but we aren't really snow people.
--------------------------------------------
Now I think I will practise on you readers before I write up my final instructions for my group for The Card trick Block.
This block is basically a 9 patch, made up of half square and quarter square triangles. Accurate cutting and stitching is essential. To make a 12 inch finished ( 12.5 till it's sewn to the next blocks ) block you need :
* 4 contrasting fabrics for the cards and a lighter coloured background fabric.
*From each card fabric cut a 4 7/8 inch square ( four and seven eigths inches )
*From each card fabric cut a 3 3/4 inch square ( three and three quarter inches ) aligning one side to straight grain of the fabric. ( so one big and one smaller square in each colour )
* From the background fabric cut 2 of the big and 2 of the smaller squares ( same measurements )
* Now taking care not to stretch the fabric cut each of the 12 squares in half diagonally using a sharp rotary cutter and ruler. ( there are now 24 triangles )
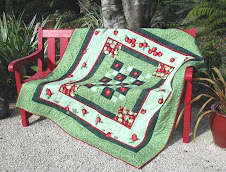
* Lay out the pieces to form the block using this photo as a guide.

Now begin to assemble the 9 patches ( 3 rows of 3 patches ). Pick up only the the parts you wish to sew and when done return them to their place to ensure you join the correct parts. Use a scant quarter inch seam, pin carefully right sides together, and above all do NOT stretch. Trim off the dog ears. ( the excess part of the seam allowance )
(You will notice there are just 3 types of patch. The one in the centre is joining 4 quarter square triangles. The others are either joining 2 half square triangles or joining 2 quarter square triangles first to form a half square one then joining the 2 half square triangles )
When you have your 9 patches sewn begin to join the 3 patches across the top row. Press the seams to the outside edge. Then join the middle row and press the seams inwards. Then join the bottom row and press those to the outside edge . This way when you join the 3 rows, to each other, which you do next, the seams should nest into each other.

That's it .
Now a few tips:
- Pressing ( not ironing which will stretch )at each stage will give a good result. Use the lip/ side of the iron to push the seam you are presssing completely open.
-To ensure your points are going to be sharp, and meeting , insert a pin through the tip your sewing line has made on the wrong side and connect the pin to the second point. Leave that pin there while you put pins in normally to hold it there. ( then remove before sewing )
- If the tail of the triangles you are sewing pulls away at the end hold it with a long pin or stiletto.
-if you are sewing a seam with a point at one end and square at the other start with the point end.
I hope that makes making this block easy!


3 comments:
I can send you a scan of the relevant page if you like, but because this version is made with squares and rectangles it doesn't quite look the same. With your triangle version you can get a wonderful effect with stripes.
These intstructions seem to be perfect, though I have not made one,... yet!
Just Googled and found your blog and now your newest follower. I was in need of a card trick block for a block swap and want to thank you for your instructions.
http://richardquilts.blogspot.com
Stop by for my quilt givaway to guess my babys b-day and weight.
Post a Comment