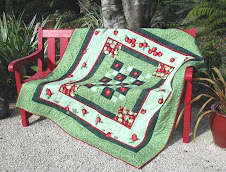
I am now quilting my small Jewel Box quilt . Here is how I went about bench basting it.

I lay it on the carpet to cut out my batting. from a larger piece.

Using masking tape I smoothed out my backing fabric wrong side up. ( in this case it is a batik so made little difference ) and stuck it to the bench.
I then smoothed the batting over the top and then the (flimsy ) quilt top over that . 3 layers. ( like a sandwich, hence the term sandwiching a quilt.)

Using curved safety pins I then secured the 3 layers every 10 or so centimetres. At this stage I leave the pins undone. I try and place the pins away from the seam lines as my first quilting stitches will be in the ditch.When it is pinned all over I rip off the masking tape and turn all 3 layers now firmly adhering to each other over.
I check the back and adjust any pins by pining from the wrong or backing side and feel underneath with my hand and take the pin I am moving away.
I do this all over till the backing fabric is lying totally smooth with no tiny wrinkles. I then flip the whole thing back to the front and repeat the inspection for wrinkles.
When happy it is as I want it I close all the safety pins.
The sandwiched and pin basted quilt can now be moved around freely for quilting.
So far I have done one half hour session quilting it. I firstly stitch in the ditch ( seam line ) in one direction, then the opposite way width wise and lengthwise. This secures the quilt and some pins can be removed.


No wrinkles. No sore knees from basting on the floor.